Plugin documentation
![]()
Last change
New instructions to apply changes from immediatly previous version.
- 0.4.0b1 : (12-10-2015) Compatibily library : OpenZwave >= 1.3.401, python_openzwave >= 0.3.0 (b4)
Target : python-openzwave, domogik (0.4.1)
Update, compile and install python_openzwave.
- Change log :
- New version for domogik 0.4.1
Purpose
Z-Wave is a wireless ecosystem that lets all your home electronics talk to each other, and to you, via remote control. This plugin allows to control zwave devices.
It uses open source library openZwave c++ project and python-openzwave as interfacing cython, The Zwave network manager is directly integrated into the plugin
Simple action/sensor of devices have access via domogik devices (widgets). Viewing and setting Zwave devices is accessed via a special plugin page from the admin panel.
Development is in progress, features will get gradually
Dependencies
- Python-openzwave (>=0.3.5)
- tailer 0.3 library for Python (>=0.2.1)
Controller/devices Compatibility List
Following interfaces are supported and verify with domogik:
- Aeon Labs Z-Stick Series 2
- RaZberry (using rule with /dev/ttyAMA0 instead of /dev/ttyUSBx)
Others controllers are supported by openzwave, you can check here
Following devices are supported :
- Everspring
- ST814 - Temperature, Humidity Sensor
- AN158 - Switch Meter Plugin
- SE812 - Siren
- Everspring (C.T.)
- HSM02 - Door windows sensor
- Fibaro
- FGS211 - Relay Switch 3KW
- FGS221 - Double Relay Switch 2x1,5kW
- FGD211 - Universal Dimmer 500W
- WallPlug - Meter Switch with leds
- Aeon Labs
- HEM - Home Energy Metter
- DSB05 - Motion Multi Sensor,
- Express Controls
- HSM100 - EZMotion luminosity and temperature sensor
- Danfoss
- Living connect (thermost heating)
Create the udev rule for controller
You may create a udev rule for this device. The rule and filename are given in the Requirements tab of the plugin configuration page.
Currently, your PC controller is known as /dev/ttyUSBx (by default). This is not very convenient nor meaningful. We will then create a new udev rule that will create a link called /dev/zwave that will point to /dev/ttyUSBx.
Gather information about your device controller (USB)
- Example using Aeon Stick2 on USB port. For ohter model it’s should different.
- Use lsusb command for listing of USB devices, check before and after plug your USB controller.
$ lsusb
Bus 001 Device 001: ID 1d6b:0002 Linux Foundation 2.0 root hub
Bus 002 Device 001: ID 1d6b:0002 Linux Foundation 2.0 root hub
Bus 003 Device 001: ID 1d6b:0002 Linux Foundation 2.0 root hub
Bus 004 Device 001: ID 1d6b:0001 Linux Foundation 1.1 root hub
Bus 005 Device 001: ID 1d6b:0001 Linux Foundation 1.1 root hub
Bus 006 Device 001: ID 1d6b:0001 Linux Foundation 1.1 root hub
Bus 007 Device 001: ID 1d6b:0001 Linux Foundation 1.1 root hub
Bus 008 Device 001: ID 1d6b:0002 Linux Foundation 2.0 root hub
Bus 009 Device 001: ID 1d6b:0003 Linux Foundation 3.0 root hub
Bus 005 Device 002: ID 0040:073d
Bus 004 Device 002: ID 10c4:ea60 Cygnal Integrated Products, Inc. CP210x Composite Device
Bus 004 Device 006: ID 0403:6001 Future Technology Devices International, Ltd FT232 USB-Serial (UART) IC
Bus 007 Device 002: ID 0b05:179c ASUSTek Computer, Inc.
- Use ls /dev/ttyUSB* to check your num USB, check before and after plug your USB controller.
- Before
$ ls /dev/ttyUSB*
/dev/ttyUSB2
- After USB plug
$ ls /dev/ttyUSB*
/dev/ttyUSB0  /dev/ttyUSB2
- Use udevadm command to gather information about your device :
$ udevadm info  -a -n /dev/ttyUSB0

Udevadm info starts with the device specified by the devpath and then
walks up the chain of parent devices. It prints for every device
found, all possible attributes in the udev rules key format.
A rule to match, can be composed by the attributes of the device
and the attributes from one single parent device.

  looking at device '/devices/pci0000:00/0000:00:12.0/usb4/4-3/4-3:1.0/ttyUSB0/tty/ttyUSB0':
    KERNEL=="ttyUSB0"
    SUBSYSTEM=="tty"
    DRIVER==""

  looking at parent device '/devices/pci0000:00/0000:00:12.0/usb4/4-3/4-3:1.0/ttyUSB0':
    KERNELS=="ttyUSB0"
    SUBSYSTEMS=="usb-serial"
    DRIVERS=="cp210x"
    ATTRS{port_number}=="0"

  looking at parent device '/devices/pci0000:00/0000:00:12.0/usb4/4-3/4-3:1.0':
    KERNELS=="4-3:1.0"
    SUBSYSTEMS=="usb"
    DRIVERS=="cp210x"
    ATTRS{bInterfaceNumber}=="00"
    ATTRS{bAlternateSetting}==" 0"
    ATTRS{bNumEndpoints}=="02"
    ATTRS{bInterfaceClass}=="ff"
    ATTRS{bInterfaceSubClass}=="00"
    ATTRS{bInterfaceProtocol}=="00"
    ATTRS{supports_autosuspend}=="1"
    ATTRS{interface}=="CP2102 USB to UART Bridge Controller"

  looking at parent device '/devices/pci0000:00/0000:00:12.0/usb4/4-3':
    KERNELS=="4-3"
    SUBSYSTEMS=="usb"
    DRIVERS=="usb"
    ATTRS{configuration}==""
    ATTRS{bNumInterfaces}==" 1"
    ATTRS{bConfigurationValue}=="1"
    ATTRS{bmAttributes}=="80"
    ATTRS{bMaxPower}=="100mA"
    ATTRS{urbnum}=="10835"
    ATTRS{idVendor}=="10c4"
    ATTRS{idProduct}=="ea60"
    ATTRS{bcdDevice}=="0100"
    ATTRS{bDeviceClass}=="00"
    ATTRS{bDeviceSubClass}=="00"
    ATTRS{bDeviceProtocol}=="00"
    ATTRS{bNumConfigurations}=="1"
    ATTRS{bMaxPacketSize0}=="64"
    ATTRS{speed}=="12"
    ATTRS{busnum}=="4"
    ATTRS{devnum}=="2"
    ATTRS{devpath}=="3"
    ATTRS{version}==" 1.10"
    ATTRS{maxchild}=="0"
    ATTRS{quirks}=="0x0"
    ATTRS{avoid_reset_quirk}=="0"
    ATTRS{authorized}=="1"
    ATTRS{manufacturer}=="Silicon Labs"
    ATTRS{product}=="CP2102 USB to UART Bridge Controller"
    ATTRS{serial}=="0001"

  looking at parent device '/devices/pci0000:00/0000:00:12.0/usb4':
    KERNELS=="usb4"
    SUBSYSTEMS=="usb"
    DRIVERS=="usb"
    ATTRS{configuration}==""
    ATTRS{bNumInterfaces}==" 1"
    ATTRS{bConfigurationValue}=="1"
    ATTRS{bmAttributes}=="e0"
    ATTRS{bMaxPower}=="  0mA"
    ATTRS{urbnum}=="134"
    ATTRS{idVendor}=="1d6b"
    ATTRS{idProduct}=="0001"
    ATTRS{bcdDevice}=="0300"
    ATTRS{bDeviceClass}=="09"
    ATTRS{bDeviceSubClass}=="00"
    ATTRS{bDeviceProtocol}=="00"
    ATTRS{bNumConfigurations}=="1"
    ATTRS{bMaxPacketSize0}=="64"
    ATTRS{speed}=="12"
    ATTRS{busnum}=="4"
    ATTRS{devnum}=="1"
    ATTRS{devpath}=="0"
    ATTRS{version}==" 1.10"
    ATTRS{maxchild}=="5"
    ATTRS{quirks}=="0x0"
    ATTRS{avoid_reset_quirk}=="0"
    ATTRS{authorized}=="1"
    ATTRS{manufacturer}=="Linux 3.0.0-24-generic ohci_hcd"
    ATTRS{product}=="OHCI Host Controller"
    ATTRS{serial}=="0000:00:12.0"
    ATTRS{authorized_default}=="1"

  looking at parent device '/devices/pci0000:00/0000:00:12.0':
    KERNELS=="0000:00:12.0"
    SUBSYSTEMS=="pci"
    DRIVERS=="ohci_hcd"
    ATTRS{vendor}=="0x1002"
    ATTRS{device}=="0x4397"
    ATTRS{subsystem_vendor}=="0x1043"
    ATTRS{subsystem_device}=="0x8496"
    ATTRS{class}=="0x0c0310"
    ATTRS{irq}=="18"
    ATTRS{local_cpus}=="00000000,00000000,00000000,00000000,00000000,00000000,00000000,00000003"
    ATTRS{local_cpulist}=="0-1"
    ATTRS{numa_node}=="-1"
    ATTRS{dma_mask_bits}=="32"
    ATTRS{consistent_dma_mask_bits}=="32"
    ATTRS{broken_parity_status}=="0"
    ATTRS{msi_bus}==""

  looking at parent device '/devices/pci0000:00':
    KERNELS=="pci0000:00"
    SUBSYSTEMS==""
    DRIVERS==""
Those information will be useful to determinate for sure that this device is your Zwave controller. We will use several information, flagged above as DRIVERS ATTRS{manufacturer} and ATTRS{product} With that, we will be sure that we’ll be talking to our controller. You can chose others attributs.
Create rule.
- Create a new file, in folder etc/udev/rules.d Let’s call it 98-usbcp210x.rules
- Enter those information in the file :
# for z-Stick serie 2 to domogik /dev/zwave
DRIVERS=="usb", ATTRS{manufacturer}=="Silicon Labs", ATTRS{product}=="CP2102 USB to UART Bridge Controller", SYMLINK+="zwave", MODE="0666"
The DRIVERS ATTRS{manufacturer} ATTRS{product} values must be coherent with what you have found above. * Ask udev to rediscover your device :
# udevadm test $(udevadm info --query path --name ttyUSB0)
- Your device should now be re-discovered, let’s confirm it :
$ ls -l /dev/zwave
lrwxrwxrwx 1 root root 7 2012-08-27 00:46 /dev/zwave -> ttyUSB0
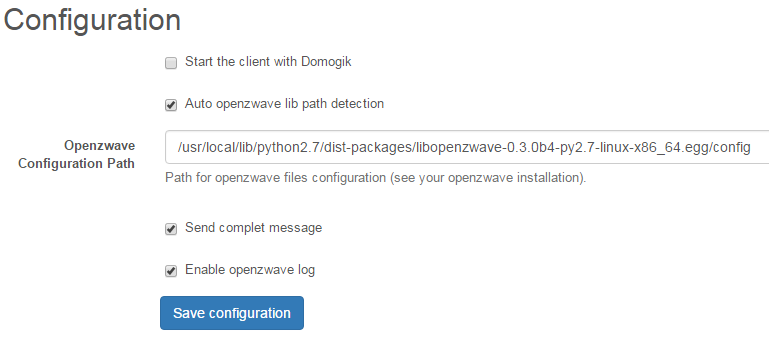
Plugin configuration

Creating devices for ozwave
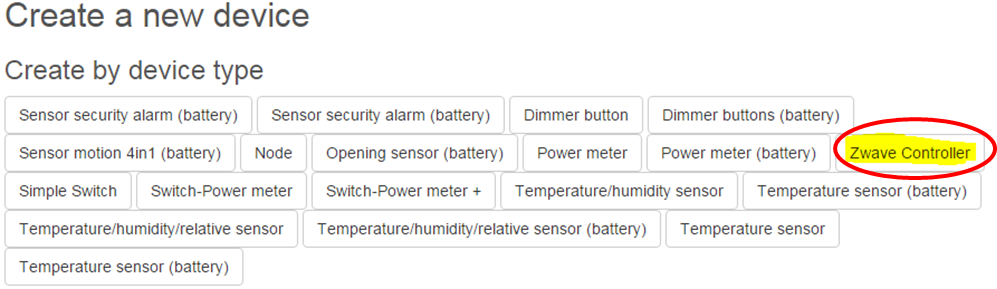
In clients page of admin UI, go to plugin-ozwave-<your_host_domogik>, select tab Devices, New to create your devices.

Create a device for the primary zwave controller
Chose instance-type : primary.controller named Zwave Controler.
Or all other device type who are a controller (Z-Stick2)
That device create a link between the driver and openzwave, also between the zwave homeId and your networkId used by domogik for devices adresse. You can create it after starting the plugin, so it is possible to find its address in the devices table of the controller and devices You can create as many Zwave Controler you have primary controllers.
Note
- Create this device is necessary to handle your zwave network.
- Main parameters
| Key | Example | Description |
|---|---|---|
| Device Name | MyController | The display name for this device. | |
| Description | What you want | A short descriptionn for this device. | |
| Reference | Z-Stick 2 | A reference for this device, eg.: manufacturer reference. |
- Global parameters
| Key | Example | Description |
|---|---|---|
| driver | /dev/zwave | Z-wave device that you have define in UDEV rule |
| networkid | MyHomeNetwork | Home ID name for association with domogik devices |
Feature example

- Main parameters
| Key | Example | Description |
|---|---|---|
| Device Name | MyController | The display name for this device. | |
| Description | What you want | A short descriptionn for this device. | |
| Reference | FGWPE Wall Plug | A reference for this device, eg.: manufacturer reference. |
- Global parameters (Extra parameters for some particular zwave device)
| Key | Example | Description |
|---|---|---|
| batterycheck | True | HCheck battery level at zwave device wakeup. |
- xPL parameters

| Key | Example | Description |
|---|---|---|
| networkid | MyHomeNetwork | Home ID name for association with domogik devices |
| node | 14 | Z-wave node id that you can find in the nodes table |
- xPL command parameters (if it’s a zwave device with command(s))
| Key | Example | Description |
|---|---|---|
| <xpl_cmds> - instance | 1 | Zwave node instance id that you can find in the Commands Class table |
- xPL stat parameters (if it’s a zwave device with sensor(s))
| Key | Example | Description |
|---|---|---|
| <xpl_stat> - instance | 1 | Zwave node instance id that you can find in the Commands Class table |
Start the plugin
You can now start the plugin (start button) and use the created devices.
Configure the features widgets on Domoweb
You can now place the widgets of your devices features on Domoweb.